| Chris Sutton's Speedster Project |
Chriskate : Home : Separation : Shortening : Front Beam : Pan Powdercoating : Brakes : Transmission : Engine : Photos : Electric Photos |
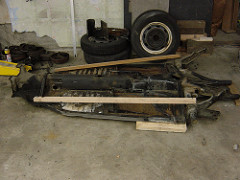
 November 2002 -
Taking a perfectly good VW pan and cutting it in half, might be the one thing
to scare you away from building a speedster kit yourself. It scared me in the
beginning and I asked both JPS and Vintage if their kit needed a shortened
frame. Well of course they both did, as they both use the same bodies.
November 2002 -
Taking a perfectly good VW pan and cutting it in half, might be the one thing
to scare you away from building a speedster kit yourself. It scared me in the
beginning and I asked both JPS and Vintage if their kit needed a shortened
frame. Well of course they both did, as they both use the same bodies.
One thing you will need in order to do the frame shortening is either some welding experience, a friend who does, or a welder who can make a house call. I had done quite a bit of arc welding on my jeep and so the welding part didn't scare me. But I did know from experience that an arc welder would not work welding that thin pan metal, which meant I needed yet another tool. That's the great part about projects, its a great excuse to get that tool you always wanted, not just because you wanted it, but because you NEED it. So, I needed a mig welder. I shopped around and found a nice Miller mig welder with a gas shield for about $500. I went in with a guy at work who also needed a mig and liked the though of splitting the cost.
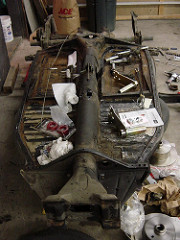
So having all the proper tools not it was time to get the pan ready to be chopped in half. This meant really stripped everything off it, including removing the front beam, which you will need to deal with later anyway. You don't need to remove the rear torsion bars.
Oh, one thing you will need which I totaly forgot is instructions. To be thourough, I got build manuals from both JPS and Vintage. Turns out they are pretty much the same thing photo copied from original CMC build manuals which can be had on the SpeedsterOwners.com website. But if you are going to get a kit from JPS or Vintage, I would recommend getting the build manual from them as they do note some minor changes to the build manual. JPS recommends shortening the pan a little bit differently by pulling the cut section out the back.
 Step one in the
process is putting the pan bottom up so you can draw with a nice black marker
or something (marker didn't work to well in all the dirt and grime) the patter
you want to cut out. Follow the build manual, it details exactly how far to
measure from different points to get these diagonal trapezoid shapes you will
cut out to reduce the pan length by I think 11ish inches (read the manual).
The manual also talks about building out of long 1x1 pieces of wood something
which will help you measure exactly how short to pull the pan together once you
cut it up. You should build these before you start, while you have a clear
head, so you can double and triple check your numbers on the length of the wood
and the holes you drill in it.
Step one in the
process is putting the pan bottom up so you can draw with a nice black marker
or something (marker didn't work to well in all the dirt and grime) the patter
you want to cut out. Follow the build manual, it details exactly how far to
measure from different points to get these diagonal trapezoid shapes you will
cut out to reduce the pan length by I think 11ish inches (read the manual).
The manual also talks about building out of long 1x1 pieces of wood something
which will help you measure exactly how short to pull the pan together once you
cut it up. You should build these before you start, while you have a clear
head, so you can double and triple check your numbers on the length of the wood
and the holes you drill in it.
Oh, I forgot another tool you will need. A cutting torch. Forget about trying to do this with a sawzall, you will go crazy, plus you all need a cutting torch in your garage. The other fun thing you get to do with a torch is light your pan on fire when you heat up all the nasty black tar undercoating stuff. So MAKE SURE YOU HAVE A FIRE EXTINGUISHER AROUND!!!!
Once you have marked out exactly what you are going to cut, take a break, read back over the directions again, and double check your markings and measurements. There are certain things in this project which you can't undo very easily and this is one of them.
 Then fire up the torch and cut away
the bottom, through the tunnel bottom, but don't cut all the way out to the
ends. You need them there for a little while longer to provide support when
you turn the pan back over. While cutting, make sure to check the underside
and make sure nothing is on fire.
Then fire up the torch and cut away
the bottom, through the tunnel bottom, but don't cut all the way out to the
ends. You need them there for a little while longer to provide support when
you turn the pan back over. While cutting, make sure to check the underside
and make sure nothing is on fire.
ALSO, while cutting through the bottom of the tunnel, make sure you don't cut any of the tubes which are hidden inside. You can take off the inspection plate back by the transmission to look down inside the tunnel.
Actually now that I think about it, you should probably have that inspection plate off by now since you really want the shifter linkage rod pulled out by now. All of this is in the build manual and if you are using my article here as the primary reference for cutting up your plan, you should reconsider how much you think I know. I'm almost as much of a newbee as you probably are, except I am now looking at a shortened pan in my garage and have some tales to tell you about my experience. At this point I still don't have a body so I don't know for sure if I shortened the pan the correct amount.
 Once you have both of the
trapezoidal floor sections cut out you can now flip the pan back over. All of
this can be done by one person, the pan does not weight that much and if you
bang it around a bit it will be OK. Don't be overly brutal though because at
this point the pan is definatly weaker.
Once you have both of the
trapezoidal floor sections cut out you can now flip the pan back over. All of
this can be done by one person, the pan does not weight that much and if you
bang it around a bit it will be OK. Don't be overly brutal though because at
this point the pan is definatly weaker.
Once the pan is back right side up you need to stop and do something I did not do and the build manual is not really clear about under later on and it's really too late.
With the pan lying flat on the floor, note what parts of the pan are really touching the floor. The very front where the front beam attaches probably is, and some parts directly under the pan, but notice that the very rear where the big transmission mounting bolts screw into is not touching. Really look at this back section, what parts are touching and what parts are not and HOW FAR off the ground they are. Write down measurements, because when you cut through the entire pan that back section is going to flop down on the ground like a shot duck. Then when you shorten the pan and go to weld it back up, the build manual will talk about making sure that the rear is not too low or things will not fit, or to high and something else will not fit. Take pictures if you need to but when you put things back together you need to make sure that the pan still has the same alignment.
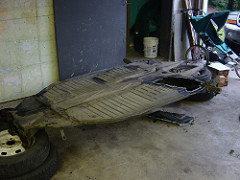
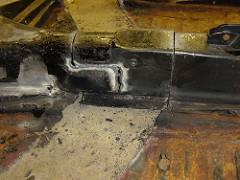 Now continue to cut out the outside
edges of the pan as well as the tunnel. There was lots of tar crap on the
tunnel and there was lots of flame and black smoke created. Make sure you are
in a well ventalated area and have some sort of mask on because the fumes are
nasty. For parts of the tunnel I found it easier to use a sawzall, yes I know
I poo-pooed it earlier, but some cuts are easier. You can see from the picture
where I cut with the saw.
Now continue to cut out the outside
edges of the pan as well as the tunnel. There was lots of tar crap on the
tunnel and there was lots of flame and black smoke created. Make sure you are
in a well ventalated area and have some sort of mask on because the fumes are
nasty. For parts of the tunnel I found it easier to use a sawzall, yes I know
I poo-pooed it earlier, but some cuts are easier. You can see from the picture
where I cut with the saw.
The whole tunnel cut out sections on the top where also somewhat confusing to me. The big tabs are to get the rear section guided into place more easily, as well as to provide some more strength when welding things back together. I did the whole top portion completely wrong some might say, but in the end it all worked out.
Again, as you are cutting be careful of all the tubes inside the tunnel Some of them you will get rid of while others you need to keep. Think twice, cut once. All of this is really hard to undo.
Once you get the center tunnel section removed, which as I remember was
actually quite a pain in the butt, you will now have two separate pan pieces
held together by some wimpy little tubes. Kind of like a really bad arm injury
where things are being held together by a few ligaments.
 Eyew. Anyway, amoung all this mess are heater control
tubes, which are smaller and if you follow then go up to the ebrake and all the
way back down each of the transmission supports. If you want heat, I think you
need to keep these, but I'm not sure how, because I don't want heat, so I just
cut them out.
Eyew. Anyway, amoung all this mess are heater control
tubes, which are smaller and if you follow then go up to the ebrake and all the
way back down each of the transmission supports. If you want heat, I think you
need to keep these, but I'm not sure how, because I don't want heat, so I just
cut them out.
There might be a gas line running down here. The JPS build manual recommends running a new gas line, so you can probably cut this out as well. I did, but have not run a new line yet. There is also two bigger tubes at the top which are parking brake tubes. These need to be cut, but at a specific length, see the build guide. Then they need to be re-bent and adjusted (see my major headache explained below). Also in the tunnel are a gas pedal and clutch cable tube. These are not cut but instead "pulled" through the back of the frame. You will need to cut the weld that holds these tubes on the back of the pan, see build manual again for details.
I tried to take lots of picture during this process of cutting things out so refer to the photo album as needed for additional views of things.
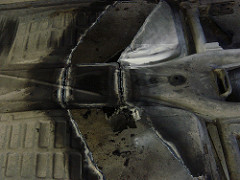
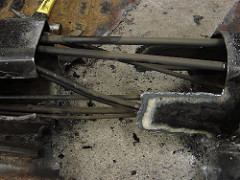
So, after you have cut out all the tubes you don't need, and have cut the parking brake tubes to the right length, and freed up the clutch and gas tubes from the rear of the pan, you can start to move the two sections together. Joining up the two sections is sort of an art I believe, and reading the instructions in the build manual it seemed a little confusing, so I took some liberties and made some additional cuts so things would line up and give more overlap and places to weld the two sections together.
 The picture on the left sort of
documents what I did which was to make some cuts on the rounded section and
bend them up so they would match up with the flat section on the front part of
the pan behind the e-brake. Once everthing came together I then bent the ends
down and around the square edges, which really helped to give some more
strength. Heat things up a bit to make them easier to bend.
The picture on the left sort of
documents what I did which was to make some cuts on the rounded section and
bend them up so they would match up with the flat section on the front part of
the pan behind the e-brake. Once everthing came together I then bent the ends
down and around the square edges, which really helped to give some more
strength. Heat things up a bit to make them easier to bend.
One of the hardest things to do was get the e-brake tubes bent correctly and lined up with the half slots under the e-brake lever. Before you start to pull the two halves together look inside the tunnel so you know what you have to line up with. Or better yet, before you cut anything check it all out so you know how it "was before". Several times I have gone a little fast and then wondered, oops, wonder what this was supposed to look like. Sort of like the lay of the pan I talked about above.
Anyway, I was able to get the two parts of the pan almost all the way together, but kept up coming about 1 inch short, so I would back things out, take a look to see if something was binding, then pull them back together again. Part of the problem was the clutch and gas lines binding at the back, whick just took some gentle bending of the tubes in the right direction. Eventually though, the problem seemed to be something inside the tunnel, and once the two halves were almost together it was basically impossible to look and see what was going on. If you have really skinny arms, you might be able to reach in from the inspection hole in the top of the tunnel and feel what is going on, but it's sort of a long way and usually your forarms get pinched.
 (Getting the e-brake tubes to line up is a pain. Put a digital
camera in the tunnel to take pictures and see how progress is going.) So, what
I finally came up with was putting my digital camera in the inspection hole and
taking a picture inside the tunnel. It took lots of pictures, but I figured
out eventually it was the two e-brake tubes which were not lining up right and
hitting against this bit slot they were trying to fit into. My solution was to
take a hose clamp and clamp the two tubes together tight so they didn't move
around independent of one another, which did the trick and the pan sections
went all the way together.
(Getting the e-brake tubes to line up is a pain. Put a digital
camera in the tunnel to take pictures and see how progress is going.) So, what
I finally came up with was putting my digital camera in the inspection hole and
taking a picture inside the tunnel. It took lots of pictures, but I figured
out eventually it was the two e-brake tubes which were not lining up right and
hitting against this bit slot they were trying to fit into. My solution was to
take a hose clamp and clamp the two tubes together tight so they didn't move
around independent of one another, which did the trick and the pan sections
went all the way together.
BUT, as I later found out when putting back in the shortened shift rod, that hose clamp I put in to hold the e-brake tubes together interfered with the path of the rod. To take off the hose clamp I had to drill a small hole in the side of the tunnel to unscrew the clamp, then jam my arm through the inspection hole and wiggle and wiggle and wiggle to get that damn thing out. So, realize that any cool neat thing you may come up with to solve a problem might come back to bite you in the ass later on.
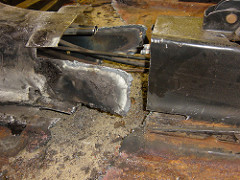
Once you have the two parts of the tunnel together, the next step is to take your two long wood pieces with two bolts in them and place them on the rear shock mount hole and then the other side on the outside hole in the front of the pan. The build instructions tell you exactly where, but there really is only 1 place that works at this point. Take a break now, and look things over, double check how the rear part of the pan is sitting (see discussion above) and make sure things are square with your wood guides.
Then get out your new MIG welder, or invite over your welding friend and glue that sucker back together. In my case I did the very top of the tunnel first, and then the outer sections of the pan which helped to stabalize the whole thing and really lock it in place. Next were the side tabs that the build manual has you cut. After that turning over the pan to do the bottom should be OK. You have to bend down the front pan section on the bottom to match the rear section, then you can weld the bottom of the tunnel. If you have a really nice pan to start with you could also weld up the sections between the tunnel and the outside where the pan gasket goes, but in my case this section was a rusted out mess, so I just skipped it because I was going to cut all of that out and repair it with new metal, which is detailed in the Pan Powdercoating section.
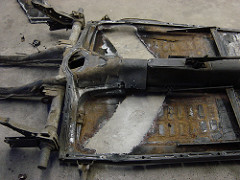
 (Pan shortened with wood guides to get exact length.)
Shortening the pan is what I would like to call the "low point" of the project.
It's when you have taken apart just about everything and have cut in half the
major doner part of your vehicle. There are probably parts all over your
garage and you start to wonder what the hell have I gotten into. But, once you
get that pan shortened, you start to feel better about things as you build up
your project car almost from scratch.
(Pan shortened with wood guides to get exact length.)
Shortening the pan is what I would like to call the "low point" of the project.
It's when you have taken apart just about everything and have cut in half the
major doner part of your vehicle. There are probably parts all over your
garage and you start to wonder what the hell have I gotten into. But, once you
get that pan shortened, you start to feel better about things as you build up
your project car almost from scratch.
The next thing to cut apart was the Front Beam...