| Chris Sutton's Speedster Project |
Chriskate : Home : Separation : Shortening : Front Beam : Pan Powdercoating : Brakes : Transmission : Engine : Photos : Electric Photos |
 (Bought my core on eBay. 2.0 L Type IV from 914.) If you have
not already done so, I highly recommened checking out SpeedsterOwners.com. You may already
be there and reading through my build site. If you have not been there and are
considering building a speedster kit, then you better get there and try and read
it once a week if not every day.
(Bought my core on eBay. 2.0 L Type IV from 914.) If you have
not already done so, I highly recommened checking out SpeedsterOwners.com. You may already
be there and reading through my build site. If you have not been there and are
considering building a speedster kit, then you better get there and try and read
it once a week if not every day.
Now, one of the more touchy subjects in the message boards there is what type of engine to run. Your basic options are either Type I, or Type IV. There is the Subaru option but at the moment I think that is pretty much only available on a turnkey car.
For quite a while I lurked on the message boards and listened to the back and forth battles that went on between the Type I crowd, championed by George Brown, and the Type IV crowd, headed by Jake Raby. There are probably pluses and minus to both, but in the end I choose the Type IV route and here is why.
First off I wanted to build the engine myself, because hey, I'm doing everything else and this is supposed to be a fun, learning project. Jake (of Aircooled Technology) was the only person I could find who offered "engine kits". They were Type IV kits so of course I needed to figure out what the differences were before I went ahead with the kit. In a nutshell, Type IV's are the later generation VW air cooled engines. They fix many of the design flaws in the Type I's and in stock form are more reliable and tend to provide much more torque than comparable Type I engines. Of course this is all subject to debate. Type IV's are used in later year VW buses, as well as Porsche 914's. I think I also leared later on in my engine project, is that Type IV parts are much harder to come by than Type I parts, mainly because there are way fewer Type IV engines out there. If you are going the Type IV route, Jake Raby is your guy.
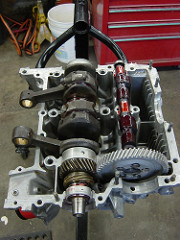 (Building back up. Reconditioned crank and new Web Cam.)
Unfortunatly, Jake no longer offers his engine kits. I got the last one. A
2056. I have heard that Jake is going to try and start selling the parts that
make up his engines. You can also have Jake build you a turnkey engine. They
are a little more money than Type I turnkey engines might be but from what I
hear they are worth every penny. The one thing I got with the last of Jake's
kits was Jakes help along the way. I was probably not one of Jakes novice
engine builders and mostly just needed to get pointed in the right direction and
learn about some of his tricks of the trade.
(Building back up. Reconditioned crank and new Web Cam.)
Unfortunatly, Jake no longer offers his engine kits. I got the last one. A
2056. I have heard that Jake is going to try and start selling the parts that
make up his engines. You can also have Jake build you a turnkey engine. They
are a little more money than Type I turnkey engines might be but from what I
hear they are worth every penny. The one thing I got with the last of Jake's
kits was Jakes help along the way. I was probably not one of Jakes novice
engine builders and mostly just needed to get pointed in the right direction and
learn about some of his tricks of the trade.
The other thing you will need if you go the Type IV route is an upright cooling conversion kit. You have two options here, one is to use one of the Porsche upright cooling kits, the other is to go with the DTM, which Jake also sells. See MassiveType4.com. Just like the differences between the Type I and the Type IV, the cooling systems also have some pretty good flame wars surrounding them. In the end I went with the DTM, as Jake has taken a lot of time and energy to test out the various Type IV cooling systems, and proven through hard data that the DTM is the best, and actually the most affordable as well.
Now, one word of advice. If you decide to go the Type IV route and decide to go with Jake, you will need one thing. Patience. Jake is a very busy guy and has about 20 irons in the fire at once. So you just need to be patient and in the end it will all work out. Even if you go with a turnkey engine, I think he has quite a backlog of orders. Even on the DTM, I was in on the first batch that he made (I have #8), and it took quite a while to get the completed shroud as he was working through lots of manufacturing issues all the while trying to build engines.
So, now back to my whole engine building process.
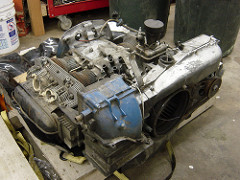
The first step was to get some sort of core engine. I had nothing to start with which was also one of the reasons going with a Type IV was an easier decision. Eventually I found a core out of a '72 914. Then engine was a 2.0L, but with 1.8L heads. After getting the core shipped up from California to Seattle I took the next step of taking the engine completely apart.
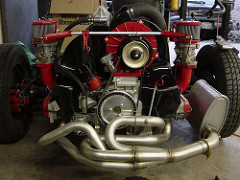
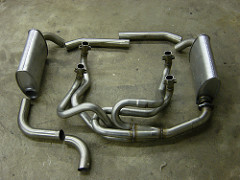 (BAS stainless header, all the way from Germany.)
This was the most fun engine tear down I have ever done. In my previous jeep
project I had worked on mostly big american V-8's and V-6's. This always meant
big heavy parts. The VW aircooled engine was a compact piece of engineering.
It was more of a puzzle trying to figure out how everything fit together or came
apart, rather than just a brute force, are you man enough to get that massively
tight bolt off and lift off the heads.
(BAS stainless header, all the way from Germany.)
This was the most fun engine tear down I have ever done. In my previous jeep
project I had worked on mostly big american V-8's and V-6's. This always meant
big heavy parts. The VW aircooled engine was a compact piece of engineering.
It was more of a puzzle trying to figure out how everything fit together or came
apart, rather than just a brute force, are you man enough to get that massively
tight bolt off and lift off the heads.
Anyway, the red book is a must if you plan on doing this. The normal Bently book does not go into enough details. The hardest part of the whole thing was "splitting the case", and that hardest part of that is finding all the bolts and nuts that hold the two case halves together. I don't have the exact count, but a Type IV has many more than a Type I, I think like 24 or something. The case should come apart fairly easily with some light tapping. DO NOT USE A SCREWDRIVE TO PRY THINGS! If it does not come apart easily you are missing a bolt or nut. There is one down between the lifters that I forget about every time. Also one down low under the rear oil seal that gets hidden under all the oil and grease gunk.
Once I had everything apart, I confirmed that I really did have a 2.0L crank, which meant less work and money for the rebuild to 2056. I then built a smallish crate and sent the case, crank, heads, rods and cylinders down to Jake for reconditioning and rebuilding. Then it's all about patience. Eventually I got everything back except the heads which were a little behind schedule and arrived a week or so later.
It was fun to get all the parts back, nice and clean or brand new, and start the build up process of the new engine. Like the rest of the project, then engine build required some new tools. A new 3/8 torque wrench that went down to 10 ft/lbs is a must. That massive 1/2 torque wrence I had from my V-8 days did not have the fine grained detail required for the VW engine. I think the tightest anything got torqued down was 60 ft/lbs for the flywheel bolts.
One of the harder things about the whole rebuild process was finding the parts that Jake did not supply in his kit. This included the crankshaft endplay shims and the deck height shims that go between the cylinders and the engine case. Both of these are really easy to find for Type I engines, but Type IV parts are a little harder to come by and Arla and I had to do some calling and driving around town to get everything.
 (Weber Carbs from CB Performance. Powdercoated of course.)
While I was getting parts I also got a dual Weber 44 kit from CB Performance and
had the intake manifolds and some of the air cleaner parts powdercoated. I also
needed to figure out what to do for exhaust and eventually decided on a BAS
stainless system from Germany, mostly on the recommendation of Jake. When I
ordered it I thought I was getting a good deal, like $400 US, but living so
close to Canada, I'm used to getting more for the US dollar, not less, so I did
the exchange calculation from Euros to dollars backwards. A couple of days
after ordering the exhaust system it dawned on me that it was really going to
cost $700 US instead. Oops. Oh well, it arrived about 3 weeks later and looks
like it will fit with only minor adjustments.
(Weber Carbs from CB Performance. Powdercoated of course.)
While I was getting parts I also got a dual Weber 44 kit from CB Performance and
had the intake manifolds and some of the air cleaner parts powdercoated. I also
needed to figure out what to do for exhaust and eventually decided on a BAS
stainless system from Germany, mostly on the recommendation of Jake. When I
ordered it I thought I was getting a good deal, like $400 US, but living so
close to Canada, I'm used to getting more for the US dollar, not less, so I did
the exchange calculation from Euros to dollars backwards. A couple of days
after ordering the exhaust system it dawned on me that it was really going to
cost $700 US instead. Oops. Oh well, it arrived about 3 weeks later and looks
like it will fit with only minor adjustments.
There was only one snafu that happened during my engine build (or at least up until this writing). After getting the heads on, I proceeded to work on doing the valvetrain geometry, which I will explain more below. This involved turning over the engine slowly and watching how far the valves moved. So it was quite a shock when I turned the flywheel and at a certain point it did not turn any more. Hmmm, thats not good. A little look through the spark plug hole showed that the exhaust valve was hitting the cylinder head. What the f--k? This is the time when you just sit there and try and remember the exact steps that you took when you put that cam shaft into the case and lined up the single dot on the cam gear with the double dots on the crank, and swear to yourself that there is no way you screwed that up.
After a short break from the garage I decided I had to back up and tear things back down and double check the crank/cam setup. About 30 minutes later I was staring at that single dot and it was about 10 teeth off being lined up with the 2 dots on the crankshaft. Wow, not sure how I missed that, but that would explain why the exhaust valve was hitting the piston. Another hour and a half and I was back to the doing valvetrain geometry again and this time nothing was hitting.
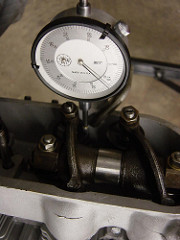 So what exactly is this whole valvetrain geometry thing anyway? Well, it's
about getting your rocker arm to push straight down on the valve when the valve
is half open. To do this you have to get your pushrods to the correct length,
or use shims under the rocker arm studs. In my case I had an adjustable push
rod that I used to get the correct length, then cut the actual push rods that
Jake sent to the right length. The pictures here to the left should show you
what you are shooting for. Looking from the side, you want to get the rocker
arm screw going straight down on the valve when it's half open. That's what you
need the dial indicator for.
So what exactly is this whole valvetrain geometry thing anyway? Well, it's
about getting your rocker arm to push straight down on the valve when the valve
is half open. To do this you have to get your pushrods to the correct length,
or use shims under the rocker arm studs. In my case I had an adjustable push
rod that I used to get the correct length, then cut the actual push rods that
Jake sent to the right length. The pictures here to the left should show you
what you are shooting for. Looking from the side, you want to get the rocker
arm screw going straight down on the valve when it's half open. That's what you
need the dial indicator for.
Once I got the long block done, I was able to bolt it up to my transmission, fill it up with oil and crank it over until I got oil pressure. Those first 20 or 30 seconds seem to take forever as you are cranking, and cranking, and nothing is registering on that oil pressure guage. Then the tempo of the cranking starts to pick up a bit, then a bit more, faster, faster, then the pressure starts to build, until eventually up it comes to about 50 psi.
Next came waiting patiently for the DTM to arrive. It was well worth the wait and really was a piece of hand crafted art, all the way down to the serial number (008) and the signed autograph in the oil cooling section. "Hand crafted for Chris Sutton, Jake Raby". As with lots of other parts, I took apart the alternator/generator so I could powdercoat the aluminum mounting braket. Instead of powdercoating the generator casing I just painted it. Powdercoating is cool, but usually a little bit on the thick side and I figured it would not fit in the generator stand well powdercoated.
Eventually I got the DTM installed, which was not that hard. A few minor cuts needed to be made to make it fit around a couple of bolts. Then came the carbs and the center linkage which needed a little extra adapter to move it further back than the standard CB setup due to the DTM.
 At this point I still need to complete some
minor things on the engine in order to fire it up for the first time, but in
talking to Jake, I need to wait until I can actually drive the car, so the
engine looks really good now, I just hope getting it fired up does not uncover
any more surprises.
At this point I still need to complete some
minor things on the engine in order to fire it up for the first time, but in
talking to Jake, I need to wait until I can actually drive the car, so the
engine looks really good now, I just hope getting it fired up does not uncover
any more surprises.
Now that the engine is done, it's finally time to order the body!!!
Some time after working on the body for a while and when I was much closer to actually driving the car, I hooked up the basic things needed to run the engine. This included a fuel pump, coil and a few wires. I ended up making a small dash board with my oil temp, pressure, head temp and tach gauges along with a on-off switch and start button.
Since the engine had sat for a while I figured it was a good idea to turn it over without the coil connected to get oil pressure up for a while. So I disconnected the coil and then pressed my starter button. It was really hard to turn over and I though oh, shit, here we go again with my bad engine luck. Then I remembered the spark plugs were still in. Once I took those out the engine turned over easily and oil pressure came up. A good minute or so of this seemed to be good enough. Then it was time to put the plugs in and fire it up for real. I pressed the start button and engine turned over and caught for a second, so I knew I was ready.
Next was a call to Jake to explain the break in procedures. Adjust valve lash to 0. Then start the engine and bring the RPM's up to 2500 (at least said Jake) and run the engine like that for 45 minutes. Timing should be 28 degrees full advance (which means checking the timing when at high RPM or where the mechanical distributor has advanced as far as it can go. Jake said not to worry about oil leaks and that the most important thing was to keep the RPM's up so the cam and other things got broken in good. As long as there were not major gushers things would be fine.
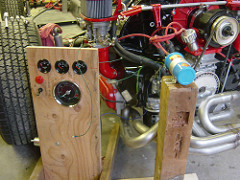 (Breaking in Engine.) So I fired it up and brought up the
RPM's. But for some reason my tach did not work, so I just did what I though
was pretty fast. It was pretty damn loud. I even had both mufflers hooked up.
I set the idle screws up to keep the RPM's up, and the did a little bit of
adjusting on the timing. Then it was just sit there and watch it run. The oil
pressure was good right off the bat. After a little but the oil temp came up
to 180 and the pressure was 60. Head temp never showed anything (which was due
to a wiring problem explained later).
(Breaking in Engine.) So I fired it up and brought up the
RPM's. But for some reason my tach did not work, so I just did what I though
was pretty fast. It was pretty damn loud. I even had both mufflers hooked up.
I set the idle screws up to keep the RPM's up, and the did a little bit of
adjusting on the timing. Then it was just sit there and watch it run. The oil
pressure was good right off the bat. After a little but the oil temp came up
to 180 and the pressure was 60. Head temp never showed anything (which was due
to a wiring problem explained later).
There were some oil leaks. A couple by the pushrod tubes, one from the oil temp sender, and one from the rear main seal. I got a gallon of super unleaded gas for the break in, but after about 15 minutes it was clear that 1 gallon was not going to be enough. Luckly I had some normal unleaded gas for the lawn mower that got us through the 45 minutes. At the end I just cut the power. This was probably not the best thing to do as I got a nice backfire. It would have been better to just cut down the RPM's, then shut it down.
Then Jake said to let things cool down completely, then measure the valve lash. As long as things were within 0.010 that was good. 0.006 was normal. The next day I did my measurements. 0.000, 0.000, 0.003, 0.000, 0.003, 0.000, 0.008, 0.006. Which meant that nothing expanded or broken in weird. So then it was adjust the lash to 0.006 and get back to the body and wiring.