| Chris Sutton's Speedster Project |
Chriskate : Home : Separation : Shortening : Front Beam : Pan Powdercoating : Brakes : Transmission : Engine : Photos : Electric Photos |
 October 2002 - As with any new project there is exists a buz, an
excitement, at the initial stages. You have a vision of the final product in
your head and you are sure you can get it done in no time flat.
October 2002 - As with any new project there is exists a buz, an
excitement, at the initial stages. You have a vision of the final product in
your head and you are sure you can get it done in no time flat.
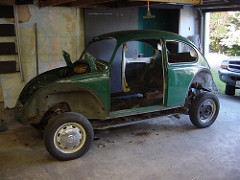
Then reality sinks in and you are brought down to earth trying to figure out how to get this P.O.S. into your garage so you can start taking it apart. In my case getting the bug home was not too big a problem. A quick trip up Aurora ave. to the local U-Haul to get a tow dolly, zip on back to Bugaid and tow the sucker home. My recent upgrade from my V6 Toyota to a V8 Dakota made a world of difference in towing.
Once the challenge became figuring out how to get the bug up the relatively steep incline from the road into my garage. Backing the bug on the tow dolly was not an option because of the double pivot problem between the ball join and the dolly centerpin. Going forward works well, but going backwards results in a quick double jacknife. Not even those nifty four wheel stearing Chevys I see on TV would help in this case.
So, lets try and pull it into the garage. Truck goes all the way in with the bug part way up the incline, almost in the garage. Hmmm, now what. Well, lets block the back wheels of the bug, unstrap it from the dolly and then pull forward another couple of feet and pull the dolly out from under the bug. Ok, no problem, minor loud noise as bug dropped off dolly. Doesn't jump blocked rear wheels and roll down the hill into the ditch opposite the driveway which is good (hey, I think the e-brake still works!).
 With some 20
point turns the Dakota is now out of the garage and there is nothing in front
of the bug but a big open 2 car garage ready to be strewn with parts. The
really cool way to get it up the last few feet of incline would be to run a
pulley up to the back wall of the garage and "winch" the bug in. But alas,
knowing my luck I would probably pull the back wall of the garage down instead
of pulling the bug in. So, we go to phase 2. This bug can't weight that much
without an engine. Lets try just good old muscle. No go. Weights more than I
thought. Ok, back to brute horsepower. Get the Dakota behind the bug and just
push it in. Denting the back of the bug is of no concern but getting "bug
green" paint on my nice new chrome bumper is of great concern. Now what can I
use as a pad? Hey, look at that crappy old vw rear seat in the back of the
bug! A little bit of rope to tie it down and bam, up it goes into the garage.
Chaulk that up as a win. No damage to me or the truck.
With some 20
point turns the Dakota is now out of the garage and there is nothing in front
of the bug but a big open 2 car garage ready to be strewn with parts. The
really cool way to get it up the last few feet of incline would be to run a
pulley up to the back wall of the garage and "winch" the bug in. But alas,
knowing my luck I would probably pull the back wall of the garage down instead
of pulling the bug in. So, we go to phase 2. This bug can't weight that much
without an engine. Lets try just good old muscle. No go. Weights more than I
thought. Ok, back to brute horsepower. Get the Dakota behind the bug and just
push it in. Denting the back of the bug is of no concern but getting "bug
green" paint on my nice new chrome bumper is of great concern. Now what can I
use as a pad? Hey, look at that crappy old vw rear seat in the back of the
bug! A little bit of rope to tie it down and bam, up it goes into the garage.
Chaulk that up as a win. No damage to me or the truck.
Now the fun begins. The inside of the bug was filled with lots of crap, musty carpet, old fast food wrappers, some mail, and about $1000 in loose change. Out it all goes into the garbage cans. Next come the seats and since I had no plan to "reuse" them, the sawzall came in handy when I could not figure out what bolts to undo. Just chop it up. The ultimate goal for the day was getting the top separated from the pan and I was determined that this was not a hard to reach goal. After the seat, the rest of the dismatle went a little slower, as I had to decide what I really wanted to save and what could get junked. The gas tank, steering column and VIN tags were all things I figured I would need so they went over to the "save" workbench. I also saved most of the nuts and bolts just in case.
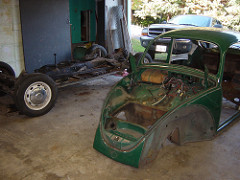
As with any new project, there is that break in, get to know you phase where you crawl around, over, and under everything, trying to figure out what every visible nut and bolt does. In this case it was a search for all the bolts which held the body to the pan. Eventually they were all found and, with the help of a nice long breaker bar, conquered. With surprising ease I separated the body slighly from the pan. And with a little more "light" lifting and a big crash the whole body was soon next to the pan in "bay 2" of the garage.
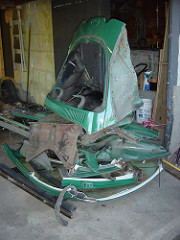 Now for the really fun part. Out comes the
sawzall again and we proceed to chop, chop, chop, until all we have left is a
small pile of green squashed bug which eventually makes it back in the truck
and on to Bugaid where it gets recycled.
Now for the really fun part. Out comes the
sawzall again and we proceed to chop, chop, chop, until all we have left is a
small pile of green squashed bug which eventually makes it back in the truck
and on to Bugaid where it gets recycled.
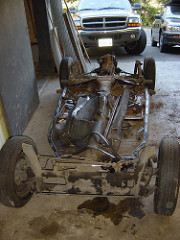
My destruction appetite satisfied it was now on to taking more of the pan and running gear apart. More lurking, exploring and wrenching started to produce a bigger pile on the "save" workbench. Some parts were pretty easy to take apart, while others like the front end ball joints and linkages were another story. A pickle fork and some sharp hammer strikes proved to do the job, but at the cost of trashing some rubber boots. I should probably replace all those anyway right? The rear independant axles also proved to be a little tricky to get off as the allen wrench bolts where pretty clogged with dirt and grease. Make sure to clean them out realllly well if you end up in the same situation as me. I stripped a couple and had to resort to the vice-grip method from hell to get them off. One other thing that I did a little wrong was loostening the big nut on the rear wheels which keeps the wheel and brake drum on the axle. Much easier to do it when you have 4 wheels on the ground and an e-brake that still works.
 Eventually the fun of taking
things apart the right way came to an end and brute force took over for a
couple of things. In taking apart the front spindles and swing arms I pretty
much destroyed the rubber boots so at the minimum I would need new boots (and I
should probably replace the ball joints too huh). The top arm joints have this
thing with an offset hole (not sure of the exact name), which the alignment
shop uses to adjust the camber?/caster? of your front wheels. Well this this
should just come off the ball joint post, but if course being about 30 years
old it was pretty much rust welded on and nothing was going to get it off. So
the right thing to do, of course, was to junk all the ball joints and start
over fresh. Well, getting the ball joins "unpressed" from the front arms was
no small task either. More "rust weld", but this time the hammer won. But not
before I made sure and marked the position of the ball joints. Did I mention I
have a manual at ths point. Make sure if you are embarking on this project to
get yourself the "Official" Bently VW Service Manual. It helps explain how to
take apart all that German engineering.
Eventually the fun of taking
things apart the right way came to an end and brute force took over for a
couple of things. In taking apart the front spindles and swing arms I pretty
much destroyed the rubber boots so at the minimum I would need new boots (and I
should probably replace the ball joints too huh). The top arm joints have this
thing with an offset hole (not sure of the exact name), which the alignment
shop uses to adjust the camber?/caster? of your front wheels. Well this this
should just come off the ball joint post, but if course being about 30 years
old it was pretty much rust welded on and nothing was going to get it off. So
the right thing to do, of course, was to junk all the ball joints and start
over fresh. Well, getting the ball joins "unpressed" from the front arms was
no small task either. More "rust weld", but this time the hammer won. But not
before I made sure and marked the position of the ball joints. Did I mention I
have a manual at ths point. Make sure if you are embarking on this project to
get yourself the "Official" Bently VW Service Manual. It helps explain how to
take apart all that German engineering.
Next step, frame shortening...