 Gathering Parts Gathering PartsThe first thing we need to do was start to gather parts. We had the engines and we sort of know all the other parts we needed. Of course we wanted them all right now so we could build the carts and tear around in them. Nothing ever happens this way though. We had the engines, we could get the metal and we could get some stuff from Aurora Lawnmower. We needed torque converters and tires. Ted spent may lunch hours driving around south Seattle searching for both of these. The front tires and rear rims Ted found. The rear tires we ordered from JC Whitney which took about a week to get here. Ted also tracked down the torque converters but they too needed to be shipped. The place he found them from said it would only be a couple of days, but that streached into more than a week. Ted was about to walk out on the place when they finally showed up. We got them for $125 each instead of the $160 we thought so that was cool even though we had to wait.
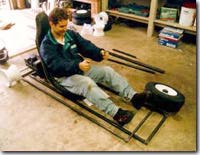
During the waiting we started to build up the frames. I had roughed out most of the basics before we began. We already had the seats which we borrowed from my jeep and the engines so we were able to lay things out to make sure everything would fit. We used 1" square tube for the bottom and 3/4" round tube everywhere else. Ted did the cutting while I welded. One thing that was really hard to do was cuttting angles on the steel to fit the corners together. We were using a reciprocating saw to do the cutting and anything other than 90 degrees never came out right so we either did alot of griding or I filled in alot of gaps with the welder. It didn't look pretty, but it was damn strong. I think we over engineered a lot of things. All you had to do was weld a few more 3/4" pipe braces and suddenly the whole thing got really strong.
One thing we knew we wanted was front suspension. We scratched out many different ideas and look at different designs and sort of came up with a single A arm with a shock attached up to the frame. This looked pretty good in theory, but in practice it needed some help. The first problem was the shocks were not strong enough, or at least Ted's weren't. If there was no weight on the Kart, it was fine, but if you sat in it, the tires would squash out to the side and toe out because of the way the steering linkages were setup. My shocks were not really as bad and didn't have much travel. Ted got some stronger shocks but these had too much travel so the tires were either toed in too much or out too much. We fixed this after alot of dinking around. Neither Karts worked well on pavement. The front wheels would grab too much on the pavement and toe out and pull the suspension down. Also, our rear axle was solid so any turns on pavement bound the tires. Gravel was fine because the tires broke loose easily.
Almost every night for a couple of weeks and a couple of full weekend days we works on the carts. It took alot longer than we thought and making two of course took longer. The nice thing was that once you figured out something on one cart, it was easy to do on the other. For a while, neither cart was Ted's or Chris's, we just worked on both, then later, sort of agreed on whose was whose. What sucked was working so long and not really being able to drive them around. Several times we were able to push them down the road to try out the steering which was sort of fun. There was one design flaw with the steering. Most of the design details we didn't work out until it came time do build them. The steering was one example. We had the basic frame done, and the front axles and steering linkages. It was just time to figure out where the steering column went. We worked on mine first and I found a good place to put the column. We welded in the mounts, stuck in the column and attached the linkages. Then I got in, stuck a pair of vice grips on the pipe for a steering wheel and turned the wheels.
Many of the details of contruction sort of fell into place. Where should the engine go, well, it fit's really nice here and lines up with the axle well here too, so that's where it will go. I think sometimes the people at GM do the same thing. The just start making a car and figure out once they are into it where to put the oil filter. Well, the only place left to put it is right under the exhaust pipe, so let's put it there.
One very helpful tool that we used besides the welder (you can do alot of cool stuff with a welder) was a little metal lathe my grandfather send out to me. We were able to make some small aluminum fittings to attach the brake rod and accelerator cable to the peddles. I tried turning some steel but that was a major pain in the butt. Aluminum was like working with butter. Not all work We didn't work all the time, in fact, sometimes we would just sit there and look at what we had done so far and just admire the things, with a beer in hand of course. It was during those deep thinking periods that we figured out alot of those minor details. There were also some short test drives down the street, some powered and some not. We did many test runs just rolling down the street without the engine to try and tune the front suspension. We did get the engines, sprokets and brakes hooked up so we could take a test drive up the street under power which worked allright. They seemed a little underpowered but most of that was just that the throttle was not setup right and the governer was kicking in too soon. Also the engines had never been run so it took some running with the choke on and adjusting of the carborator to get it running smoothly.
Now all that was left was a real test drive! next: Test Run |
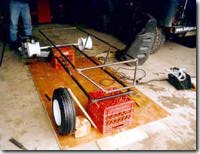 Basic Construction
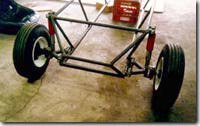 Front Suspension
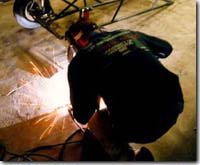 Working, working
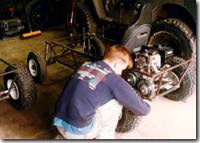 The problem was that when I turned right, the wheels turned left. Oops, simple lever problem that was really obvious when you looked at it. Ted said I would get used to it, but we moved the column around and made it right anyway.
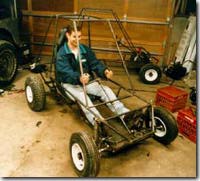 Tools
Tools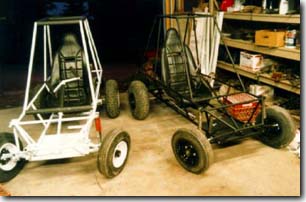 Once we had the roll bars and seatbelts in (ya, seatbelts, Ted didn't think we needed any but I didn't think it would hurt) all we had left to do was paint them. Ted wanted to paint his white, while I wanted mine flat black.